

Appearance
Using the overlay
Choose a look while you play, then adjust it to suit the picture. If you haven't set up your game yet, start with Getting started.
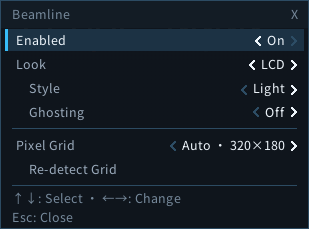
Open and close
Once the game is visible, press Home to open the overlay. Press it again or Escape to close it. If you chose another key under Settings → Overlay shortcut, use that key instead. Shortcut changes take effect when the game next starts.
- Up/Down selects a row.
- Left/Right changes a value.
- Enter activates an action, such as Detect Grid, or starts editing a number.
- With a mouse, click the on-screen arrows to change values and click actions to use them.
When editing a number, type the value and press Enter to accept it. Backspace deletes a digit; Escape cancels that edit rather than closing the whole overlay.
Turn effects on and choose a look
Set Enabled to On, then choose CRT, LCD, or VHS under Look. New game setups start with effects off. Switch Enabled back to Off to compare with the original picture; your chosen settings are kept.
CRT
CRT adds scanlines and the glow of an old television or monitor. Under Style, try Core for a cleaner picture or Studio for a stronger vintage look.
Presentation offers Flat, Curved, and Curved + Bezel. Curved bends the picture like a tube screen; Curved + Bezel adds the surrounding screen housing. With that housing enabled, Reflection lets the picture light it up.
LCD
LCD adds a pattern of tiny screen cells. Under Style, Light gives a subtler pattern, while Strong adds colored cells. Ghosting adds trails behind moving objects.
VHS
VHS adds videotape softness, color bleed, and noise. It has the same Presentation choices as CRT, with Reflection available for Curved + Bezel. It does not need a pixel grid.
Saving your choices
Changes apply immediately and save after a short pause or when you close the overlay. They return on your next launch.
Optional: adjust the pixel grid
These controls appear with CRT or LCD enabled.
Default behavior
The default Pixel Grid mode is Auto. It uses a saved calibration when one applies, or the game's output resolution otherwise. Detection runs only when you request it. Screen always uses the output-sized grid, including when a calibration is saved.
Auto / Detect Grid
During normal gameplay, choose Auto under Pixel Grid, then select Detect Grid and press Enter or click it. Avoid menus and loading screens. Detect tries to measure pixel spacing in the displayed picture so the effect can use it.
Detection may not find a reliable grid. A failed or cancelled attempt keeps your previous calibration. A successful result is saved, and the action becomes Re-detect Grid.
A saved result applies only at the output size used for detection. At another size, Beamline keeps the calibration but stops using it. If you change the game's internal pixel scaling, use Re-detect Grid, even if the output size stays the same.
Manual Grid
Width and Height set the number of grid columns and rows. Smaller dimensions make CRT rows or LCD cells larger without changing the game’s rendering resolution.
Choose Manual under Pixel Grid, select Width or Height, press Enter, type the number, and press Enter again to accept it.
Virtual Resolution
Choose Virtual under Pixel Grid, then adjust Resolution. The number is the resampled image’s height; Beamline derives its width from the content’s aspect ratio. For example, 540p produces a 960×540 image from 16:9 content.
The resampled image must be smaller than the content in both dimensions. Choosing 1080p for 1920×1080 content does not resample the picture. The game’s own rendering resolution stays unchanged.